LOGIN
You will go here to login using your username (eg paula) and password. If you forget your password you can click “Lost Your Password?” to get an email to re-set it.
The login will open a dashboard where the options you need to update the site content are all in a black sidebar on the left.
When you are logged in you (and only you) will also see a black toolbar at the top of every page and post in your live site, with links enabling you to edit pages and posts or create new pages and posts.
The links to pages will only open the top-level (parent) page you are looking at, so if you on an index page that includes excerpt/read more content from child-pages or multiples posts (like the HOME page), you will need to use the bright green “Edit This” links in the page itself (or find the individual child-pages or posts via the dashboard) if you want to edit content that’s already live.
You’ll find that if you open “Pages” (from the dashboard’s black sidebar) the pages that have editable content are:
- Home
- About
- The child-pages under “Texts”
- Press
- Books
- Magazine Work
- Biography
- Advertising
- Correspondence
- Pricing Notes
- Contact
The Gallery page is just a “holder” for content that is created and edited via the special “Artwork” custom-post-type. You won’t need to “Add” any new pages unless you want a whole new section in your website (in which case, talk to me)
You can open any of the existing posts in these sections when you open them up and you can add new posts. You’ll see the “Add New” buttons for each post-type once you start to interact with the links in the Dashboard sidebar.
PAGES
Home
The banner image is set via code/css.
The text below that banner is editable in the “Excerpt” field of the “About” page (HERE). The content that is in the big main content field when you open this page is for the About page itself, so be sure to look for the “Excerpt” field to edit the homepage about content (which is shorter). If you’re on the home Page you can click the little green Edit link below the text to open that page to edit it.
The images and texts for the four Artwork categories displayed on the homepage are editable via the Artwork > Artwork Categories (in the black sidebar, backend HERE). You’ll see there the four parent categories as well as a number of child categories under Special Series.
If you want to create more special series, create a category and select “Special Series” as the parent category in the process.
You can edit the text and image content of each of the four main parent categories by clicking on the edit link for each eg:
- Woodcut Prints
- Illustrations
- Watercolors
- Special Series
Editing the text is simple (edit and save). Changing an image is a little tricky, as once you’ve deleted an image here, you need to navigate to the media library to choose the new one and copy the url from the image’s url field and paste it in the url field here.
Open one of the categories and try this. If you get confused, exit out of the category without saving your changes so that the old image does not disappear until you figure out how to put a new one there.
ABOUT
The longer text for the about page is in the main content field.
The text for the homepage is in the excerpt field.
The featured image attached to this page is displayed on the about page.
TEXTS
Each Texts section on the Texts page is a child PAGE in the Pages section and is set up as:
(i) a gallery of images of the original texts (click the little “select gallery” icon above (it resembles a stack of images) to access the gallery in edit mode to add/delete or re-arrange the images). Use JPEGS (not PNG files) and save at low enough resolution to keep the images at <100kb wherever possible.
(ii) Add the url for a pdf with all the transcripts in the field below the main content field. You will need to first upload the pdf to the media library and then copy the url of the pdf so that you can create the link to it. The pdf url is displayed in a field called “PDF URL” when you have the pdf data record open in the media library (click the pdf icon to get this). Once you add the link there, a link “View [SECTION-NAME] as texts” will automatically display below the image-gallery.
You can search for all the pdfs already uploaded by searching for “pdf” in the media library. PDFs can’t be edited but you can upload a new pdf if you need to update them (at which point, you’ll probably want to delete the outdated one, to avoid confusion).
Make sure you use jpegs not PNG files for these galleries and resize the jpegs to be no larger than 1200px max dimension. Edit the title field for the images with a good display title.
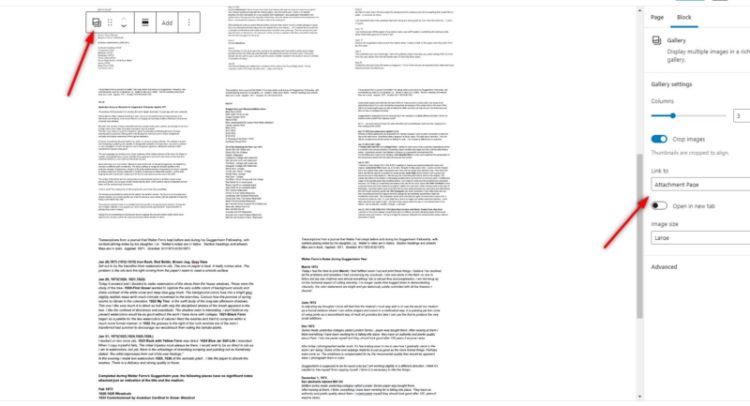
The gallery’s “Link to” option needs to be set to “Attachment Page” to enable the images top open as single page with their image titles as page titles (and you need to edit the image titles for these to look good). See image below for where to choose that option:
CONTACT
You can edit the image and text above the form on the contact page HERE.
UPDATING ARTWORK CUSTOM-POST CONTENT
This is where you’ll be adding completely new artwork content (and you can edit existing content).
Click Artwork in the dashboard’s black sidebar and either click on the title of an existing artwork to make edits or click the “Add New” button on the page or in the sidebar to open a new blank record.
Each artwork record should have:
- Title (in the title field)
- Featured image (the close-cropped version)
- One of the four main categories checked (and, if special series, also a child category)
Each artwork record may also have:
- A descriptive text in the main content field.
- Matted image
- Any number of tags assigned (and you can add new tags)
- Artwork data entered in the “Artwork Data” custom fields, as follows:
– Media
– Year
– Image Size (small, medium, or large)*
– Image dimensions (width x height)
– Matted (Y/N)*
– Matted dimensions (width x height)
– Framed (Y/N)
– Framed dimensions (width x height)
– # of prints *
– # signed prints *
– Original Sold (Y/N)
– Artist’s Proof (Y/N) *
– # of prints sold *
– Sale price *
– Print price *
– Exhibition History (here you can add entry after entry; it’s best to do this in the order you want the items to display, as they display in the order you enter them)
– Press coverage (as above, you can enter multiple lines but it’s best to enter them in the order they are to be displayed)
– Research Notes * (you can keep any amount of notes here)
– Location (where the original artwork can be found)
Please view this test artwork record to see how the data is entered in the backend:
If you assign it the category woodcut prints, you can see how it is displayed HERE.
NB it won’t display until you assign it a category, so once you have unchecked the category, that link won’t work.
You’ll see that the matted image displays on the single artwork page (while the close-cropped version displays as a thumbnail on the by-category index page).
If you open the single work in a browser window without being logged in (use a different browser to the one in which you are logged in) you can see the artwork record the way the public will see it.
If you view the artwork in the same browser in which you are logged in, you will also see a grey box at the bottom of the page that displays the private (asterisked, above) data.
Note that tags are being used for the PUBLIC to be able to search for work by tags like “Barns & Villages”, “Corporate” etc. Don’t use the tags for private categories, as all the tags will display to the public.
You can experiment with this page to see how the content changes depending on what data you enter.
SEARCH ENGINE OPTIMIZATION
Open up the Image Alt Text and SEO Entry pages in the dashboard and you’ll see fields where you can add keyword-rich descriptions that help search engines find you.
Every image should have “Alt Text” that describes the content of the image (i) accurately (for the sight-impaired users who rely on having these texts “read” to them and (ii) judiciously, in terms of using terms that searchers will use.
It’s better to write, eg: Book cover by Walter Ferro for The Nick Adams Stories by Ernest Hemingway
than just: The Nick Adams Stories by Ernest Hemingway
The longer version will help people searching for book cover artwork by Walter Ferro.
Likewise, be sure to use a very specific phrase that someone might enter in a search when filling out the “SEO Title” fields (and put the most well-known term at the beginning), eg:
Woodblock print by Walter Ferro – Dunes
rather than just:
Dunes by Walter Ferro
or:
Dunes – Woodblock print by Walter Ferro
The Meta Description should also be filled with a 1-2 sentence description for each page—again incorporating terms like “beach scene engraving” or “picture of beach dunes” that someone might actually search for.
You’ll see I put “Sandy beach dunes print by Walter Ferro featuring beach grasses and seagulls and the ocean in the distance.” As an example for the Dunes print. This is tedious work but it makes a big difference to getting the website to succeed with people searching for work like this.
Whenever you’ve made changes here, remember to click “Submit” at the bottom of the page.
See also: https://www.hamiltrowebsitedesign.com/basic-wordpress/